Sunday, January 16, 2011

Heart Shirt

If you know me at all you may have noticed that I really love to wear plain white v-neck shirts day to day. It's actually not the most fashionable pick in my wardrobe but they're just really comfy and I always end up wearing them to work a lot. Another plus to having so many of these in my closet is that when I stumble across a really cute idea for a DIY shirt I already have an inexpensive shirt lying around and I don't care about ruining if it doesn't work out so well. And another plus...I get to take a pretty boring plain shirt and hopefully turn it into something kind of cute!

As always, this is not an original idea that I can call my own, so here's the inspiration behind my latest creation:
found these here
So I grabbed a white shirt and went to work...everything I used was just lying around.
Plain White T-Shirt
Fabric Paint (I just used some puffy paints)
Heart Shaped Cookie Cutter
Paint Brush
I chose school colors but now I want to do another one with either purple or teal.
Of course I had to slap on a few polka dots and a couple of rhinestones...even a tiny bit of glitter in there too!
Not bad for a Sunday afternoon of crafting while watching a little Laguna Beach and now watching the Golden Globes Red Carpet as I type this.
:) Happy Sunday all! Hope everyone has a terrific week. School starts on Thursday for me, so let's all cross our fingers that I don't neglect my blogging hobby completely!

Thursday, January 13, 2011

Awww Man! That Was My Favorite Headband!

Broken. :(
I'm pretty sure I made this headband like, two years ago. I loooved it so. But a couple of weeks ago I went to wear it and well you could probably draw your own conclusions from the picture.

It may not look so hot here but I promise it was really cute and it was my favorite! Here was my inspiration, two years ago or so on The Hills:
Whitney Port's Headband
Erika Pena - Healy Headband
$665
I searched everywhere for this headband, or even something similar. Nothing. I ended up finally finding the exact one but of course it was waaay over my budget so I did what I always do in that situation...I came up with my own. Hers is a lot prettier than mine. It's made of a bunch of swarovski crystals. Maybe if I had the patience I could use millions of tiny rhinestones but I don't so my version will just have to do.
I found some really awesome fabric that had shiny gold detail to it and then it came time to decide what I was going to use for the round disc-like pieces. I just so happened to look into the hall closet full of all kinds of junk and found a box of poker chips. I covered the poker chips with the fabric, just a little hot glue on the back and added a rhinestone in the middle of each one. Pretty easy. Then I had to place the headband on my head to figure out placement but that was about it.
The next project at the top of my list is to re-make this headband because I loooove it and really really miss it!

Wednesday, December 22, 2010

Subway Art

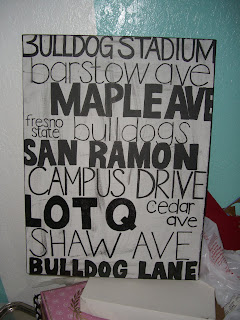
A cool trend out there in the crafting world right now is Subway Art. I thought I'd try my hand at it and I've made a couple of attempts so far. My first piece was done for my cousin Blake's college graduation present. I just got a pretty large sized canvas...can't remember which size exactly, sorry....and I free handed the writing first using pencil and then going over with paint pen and in some places acrylic paint. It came out oookkaaay, but I guess he liked it enough...it's hanging at his house! It has all the street names and the name of the football stadium and other landmarks from around campus. If I could do it again I think I would use the school colors and maybe even throw in a logo or the mascot somewhere but for my first try and by hand (no vinyl) I'd have to say not too shabby. Check it out...
And for my second attempt at subway art...first my inspiration:
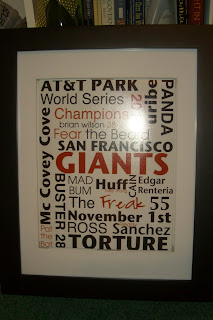
Yup! The San Francisco Giants won this little thing called the WORLD SERIES! And they just so happen to be the inspiration behind my second work of subway art! I went to Michael's during a pretty decent picture frame sale and got a plain black frame with the matte already included for about $11 or so! Basically a steal in my opinion, because it's a pretty nice frame. I think it usually ran for like $30 or something like that. This time I used my wonderful MacBook to make the subway art, turned it into a pdf and sent it off to Costco to be printed as an 8x10.
The Finished Product
And just because I loooove this picture:


Tuesday, December 21, 2010

Take 2

I just completed, quite possibly, the most difficult semester of my college career...maybe even educational career! (although Jr. year of HS was pretty rough too) Anyways, I thought I was starting this thing up back in May, but my little cookie side business kind of consumed my life over summer break, only to be replaced in the fall by school. So here I am, winter break has finally arrived and I would really like to give this another go! Even though school was kicking my butt for the last four months I still managed to find time for a little creativity. So I'll start back up with a round of pictures of everything I was able to squeeze in, in between Linguistics, Earth Science, and all that other important future educator knowledge! haha

My first attempt at sugar cookies with royal icing...

Coach Cookies
Coors Light Bottles
Lady GaGa Cookies
Birthday Tulle Frame
Kim's Camera Cookies
Tutu Canvas Bag
Cupcakes


Tuesday, May 25, 2010

Sooo cute!

Sometimes I find things on crafty blogs that I can't wait to make but I just don't have an excuse for it...this is definitely one of those times. Check it out...just found Posh Pixels Design Studio blog and I came across these wonderful, adorable, perfect for spring/summer treat bags! I think I'll have to buy some white gerbera daisies at work soon and polka-dot them, put a cute little rhinestone in the center and voila! They're just so cute, I can hardly stand it! Loooove the stickers on the kisses idea too!


Can't wait to post the pictures of the cookies I made for my friend Kim's going away party tomorrow!

Sunday, May 23, 2010

A couple of weeks ago I stumbled across this blog, Treasury of Memories, there are soooo many cute ideas! My favorite: The Canvas Collection! I'm always looking for a good picture related craft. I've definitely been lagging on the picture taking the last couple of years (just ask my friend Tori) but after high school there just haven't been as many special events like there used to be. But I'm getting side tracked...here are just a few of my favorites, that inspired me the most...
All I want to do is make more, more, more!
Spring is here so I needed to ditch the St. Patty's Day door decor and come up with something new. This is the third time I've used a grapevine wreath as a front door wreath. They are really inexpensive and you can do anything you want with them, the possibilities are pretty much endless. The latest wreath was this fun spring time one...
This was super easy! Michael's has the already painted little wooden bugs and flowers and I just hot glued them to the wreath. I spray painted a wooden plaque and wrote our name on it with a black paint pen. Add a little (A Lot) of tulle and more ribbon at the top and there ya go!

The one before this was our Christmas wreath...

I purchased everything for this one at the store that I work at (DFC) and wired it on.

And my first grapevine wreath creation was not for my house but for a wedding gift. The groom went to UCLA and the bride went to USC. They both played baseball/softball all their lives. So I wanted to incorporate all of those things when I decided to make them a wreath. This is what I came up with..

It's kind of hard to see the UCLA symbol because of the flash. I used the little wooden pieces that you can get at Michael's or Joann's and tied them on with ribbon. For the school logos I just Modge Podged the logo that I printed off the internet onto a plain wooden round.